Setting up a Python Project with Docker Compose and VSCode
There are many options when you want to create an application that needs to process, store and visualize data in a nice interface. You actually have tons of options for each separate layer, e.g. which datastore to use or where and how to deploy the different pieces. This is the first part of an article series in which we will have a look at one such option, from setting up the development environment to bringing everything to production.
We will create a simple example application for which we will create
For the development environment we will use docker-compose and Visual Studio Code.
The backend service will expose its API via the OpenAPI mechanism built into FastAPI. This will enable us to generate client code for our frontend with the openapi-generator. Spoiler: we will use the TypeScript + axios flavor for this.
Of course, all those things have to be tested, so we will also set up CI with GitHub Actions. The frontend will be tested with a combination of Jest and Vue Testing Library. For end-to-end testing we will use Cypress.
Once all that is done, we will deploy everything to production, the backend service to Heroku and our frontend to Netlify.
NOTE
There are other great platforms we could use for the deployment, for example Vercel instead of Netlify.
Now that you have an overview of the different topics we will tackle in the upcoming posts, let’s start with the first one: Setting up our environment for the development of our backend service.
Note that this post is not a Python or Docker beginner tutorial. The main purpose is to have a reference for ourselves and finally get rid of some issues we always had in our setup (e.g. file permission issues between Docker and the host, Debugging directly in VSCode) - but of course, we hope that it might also be helpful to others.
We are using Windows and do all our dev work in WSL2 but we expect the following to also work under Linux or Mac.
A Minimal FastAPI Application
Before we start setting up VSCode with Docker Compose, we create the basic skeleton of our Python project.
Initial Repository Setup
We will do everything manually here, step by step. You might want to use tools that generate a starter for you, e.g. a cookiecutter template or PyScaffold.
(You can find a complete repository here.)
Let’s start with creating a git repository
mkdir orders-api
cd orders-api
git init
and continue with making it a Python project:
mkdir -p src/orders_api tests
touch src/orders_api/__init__.py
To manage the package, we create a setup.py file:
from setuptools import find_packages, setup

install_requires = ["fastapi", "uvicorn"]

setup(
    name="orders_api",
    install_requires=install_requires,
    use_scm_version=True,
    setup_requires=["setuptools_scm"],
    packages=find_packages(where="src"),
    package_dir={"": "src"},
    include_package_data=True,
)
We will not go into detail here. If you are interested to get more information about setup.py files and packaging in general, head over to the packaging documentation.
To get the package version directly from the current git commit, we use setuptools_scm. The only dependencies we define for now are fastapi and uvicorn which will be enough to create a very basic FastAPI application and start it. Later we will depend on many more requirements and to manage those we will use pip-tools.
Dependency Management with pip-tools
When we added fastapi and uvicorn we haven’t restricted those dependencies to any versions (e.g. fastapi<0.61 or fastapi==0.60.2). This means that each time we install our python package, the latest version of its dependencies are pulled in. But that’s not what we want for production. In production we want to use specific versions, versions for which we know that our service works because we also used those versions in our tests. For defining the exact versions of our dependencies we will add a requirements.txt file or rather we let pip-tools create it. After installing it we can run its pip-compile command:
mkdir -p requirements
pip-compile -U -o requirements/requirements.txt"
pip-compile will read the dependencies defined in setup.py and compile a list of all dependencies, including all transitive dependencies.
#
# This file is autogenerated by pip-compile
# To update, run:
#
#    pip-compile --output-file=requirements/requirements.txt
#
click==7.1.2  # via uvicorn
fastapi==0.63.0  # via orders_api (setup.py)
h11==0.12.0  # via uvicorn
pydantic==1.7.3  # via fastapi
starlette==0.13.6  # via fastapi
uvicorn==0.13.3  # via orders_api (setup.py)
Those will be all the dependencies with their exact versions that we will install in production. What’s missing are the dependencies we will need for our tests. For that we first create a file requirements/test-requirements.in with the unpinned requirements:
-r requirements.txt

pytest
pytest-cov
requests  # for the fastapi testclient
We include our requirements.txt in our test requirements. With that, we will have all dependencies, those for production plus those for testing, in our test-requirements.txt. The last thing to do is run pip-compile again:
pip-compile -U requirements/test-requirements.in -o requirements/test-requirements.txt
Hello FastAPI
Time to create a first working application with a simple /health endpoint
from fastapi import FastAPI

def create_app() -> FastAPI:
    app = FastAPI(
        title="orders",
        description="Simple API to order products from different stores.",
        version="1.0",
    )

    @app.get("/health")
    async def health() -> str:
        return "ok"

    return app
from orders_api.app import create_app

app = create_app()
and a test for it:
from fastapi.testclient import TestClient
import pytest
from orders_api.app import create_app

@pytest.fixture()
def app_client():
    app = create_app()
    yield TestClient(app)
def test_health(app_client):
    rv = app_client.get("/health")
    assert rv.status_code == 200
After installing our requirements/test-requirements.txt and our package into a virtualenv, we can run our test and start our first service:
python -m pip install -r requirements/test-requirements.txt
python -m pip install -e . --no-deps

# running the test
python -m py.test tests

# starting the service for http://localhost:8000
uvicorn --reload --port 8000 orders_api.main:app
Nice, our service is working as expected. But our goal was not to have a simple FastAPI service running. What we want is to have a reproducible dev setup via Docker Compose that works independently of the host system.
Dockerizing our Application
Now that we have a first working service, we can start putting everything into Docker. We will create a Dockerfile and a docker-compose.yml:
FROM python:3.9

ARG USER_ID
ARG GROUP_ID

COPY requirements/test-requirements.txt /tmp/test-requirements.txt

RUN set -x \
    && python -m venv /opt/orders_api \
    && /opt/orders_api/bin/python -m pip install -U pip wheel setuptools \
    && /opt/orders_api/bin/python -m pip install --no-cache-dir -q -r /tmp/test-requirements.txt \
    && mkdir -p /workspace && chown -R $USER_ID:$GROUP_ID /workspace && chown -R $USER_ID:$GROUP_ID /opt/orders_api
RUN addgroup --gid $GROUP_ID user
RUN adduser --disabled-password --gecos '' --uid $USER_ID --gid $GROUP_ID user
USER user

WORKDIR /workspace

ENV PATH="/opt/orders_api/bin:${PATH}"

ENV PYTHONUNBUFFERED 1
ENV PYTHONPATH /workspace/src
The workdir is set to /workspace and we create a venv called orders_api in the /opt directory.
To avoid that logs or any other output from our application will be buffered and we can see everything in realtime, we set PYTHONUNBUFFERED. The last line sets the PYTHONPATH environment variable so that we don’t need to install our own package via pip install -e ..
We also create a non-root user. This user gets the user id and group id we pass to it as arguments while building the image. When we pass the user id and group id of our user from the host, we avoid file permission issues when creating files from a Docker container.
With
docker build . -t orders_api --build-arg USER_ID=$(id -u) --build-arg GROUP_ID=$(id -g)
we create an image orders_api:latest. Note the build-args for passing the user id and group id.
Let’s continue with our Docker Compose file:
version: "3.8"

services:
  api:
    image: orders_api:latest
    ports:
      - "8000:8000"
    command: uvicorn --reload --host 0.0.0.0 --port 8000 orders_api.main:app
    volumes:
      - .:/workspace:z
Here we can define all the services we need for our application. For now, this is only the backend service we called api here.
In case you are wondering why we use the image directive instead of build, that’s because we want to share our order_api:latest image between multiple services. (we will use the same one for the container used by VSCode)
The command used to start the api service is the same we saw earlier.
With volumes we make the whole project folder available in the Docker container and mount it as /workspace. The z mode indicates that the content is shared between services.
Before we try starting our service with Docker Compose, we have to create one other file, a .env file. (If you don’t know what a .env file is, head over to the python-dotenv PyPI page.)
COMPOSE_PROJECT_NAME=ordersapi
Without this, VSCode would use another Docker Compose project name than the Docker Compose. This in turn would result in our service being started by VSCode and by us but with a different container name, both trying to allocate port 8000.
Now let’s run
docker-compose up
to see if the service is starting properly.
The tests can be executed with
docker-compose run --rm api python -m py.test tests
VSCode and Docker Compose for Python Development
VSCode is a great editor, especially due to its rich ecosystem. There are many extensions adding support for your favorite languages and many other plugins to customize the editor and improve the development experience, e.g. Bracket Pair Colorizer.
The important feature we will use in this section is the VS Code Remote Development which will allow us to use our Docker containers as dev environment.
Prerequisites
Make sure you have the Remote - Containers extension. We also have the Remote - WSL extension and enabled WSL in the Docker Desktop settings since we are using Windows and do most of our dev work in WSL2.
Connecting VSCode With Docker
In case you haven’t done already it’s time to open our project folder in VSCode. If the Remote-Extension is installed correctly, you should see its quick actions Status bar item in the bottom corner:
![]()
Now you can either click on the icon or use F1 to open the Command Palette and run Remote-Containers: Add Development Container Configuration Files… and then choose from existing docker-compose.yml. This will add a folder .devcontainer which contains two files: devcontainer.json and docker-compose.yml
In the JSON file, we have configured that both our docker-compose.yml files will be used, the one we created ourselves before and the one that was just created by VSCode. What we have to change is the value for service since we want to use a service that is only used for VSCode to don’t interfere with our main Docker Compose setup.
With that, we have a config file with the following content:
{
  "name": "Existing Docker Compose (Extend)",

  "dockerComposeFile": [
    "../docker-compose.yml",
    "docker-compose.yml",
  ],

  "service": "vscode",

  "workspaceFolder": "/workspace",

  "settings": {
    "terminal.integrated.shell.linux": null
  },
  "extensions": [
    "ms-python.python",
    "ms-python.vscode-pylance"
  ],
  "remoteUser": "user"
}
We also want to have the Python Extension and Pylance installed to get features like linting, IntelliSense and more.
The new docker-compose.yml file will be very minimal:
version: '3.8'
services:
  vscode:
    user: user
    image: orders_api:latest
    volumes:
      - .:/workspace:cached

    # Overrides default command so things don't shut down after the process ends.
    command: /bin/sh -c "while sleep 1000; do :; done"
For our vscode service we use the same image we also use for our real api service. In this image, we have the virtualenv which will contain all dependencies. This is needed so that Pylance and the Python Extension can work correctly.
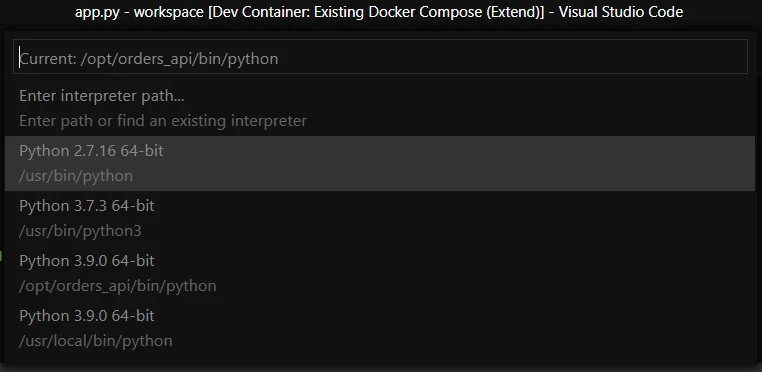
From the Command Palette you can now reopen the folder in the container. When this is working and you can select the Python interpreter of the /opt/orders_api virtualenv, we can go on and configure remote debugging.
Remote Debugging in VSCode
We will use debugpy and configure VSCode to attach to the debugpy session. The first thing we have to do is create a debug/task config:
{
    "configurations": [
        {
            "name": "Python: Remote Attach",
            "type": "python",
            "request": "attach",
            "connect": {
                "host": "api",
                "port": 5678
            },
            "pathMappings": [
                {
                    "localRoot": "${workspaceFolder}",
                    "remoteRoot": "."
                }
            ]
        }
    ]
}
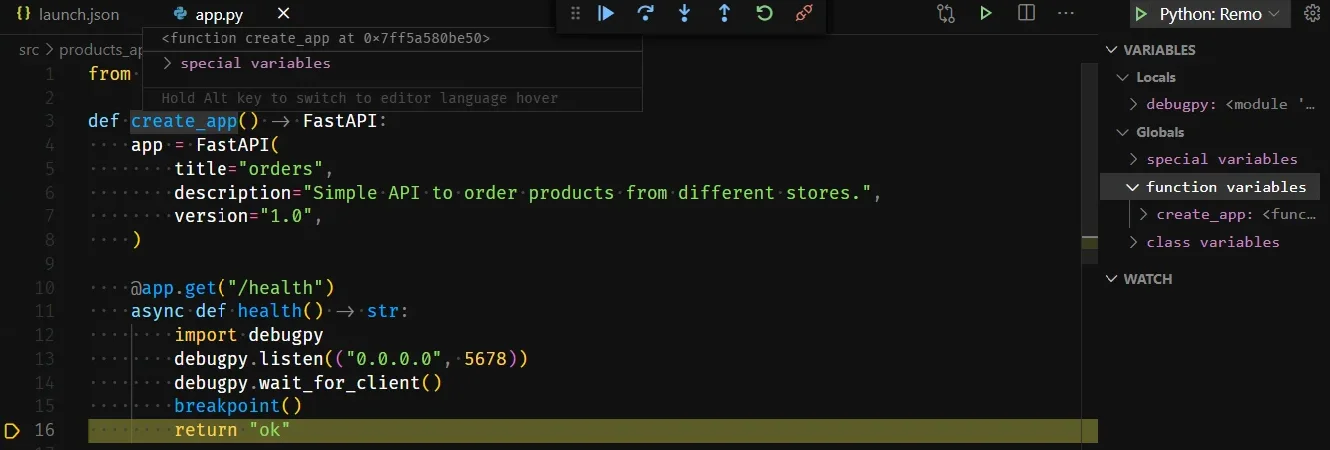
In the code we want to debug we can then use debugpy and set a breakpoint:
@app.get("/health")
async def health() -> str:
    # start debug
    import debugpy
    # avoid error in case debugpy is already listening
    try:
        debugpy.listen(("0.0.0.0", 5678))
    except RuntimeError:
        pass
    debugpy.wait_for_client()
    breakpoint(
    # stop debug
    return "ok"
Don’t forget to add debugpy to your requirements (e.g. test-requirements.in) and rebuild the image. Once everything is working, you can open http://localhost:8000/health again. This request will not finish, but wait for a client to connect for the debug session. When you execute the “Python: Remote Attach” debug config we created earlier from VSCode, you should see the following:
There are multiple commands we had to execute already, like building the Docker image and compiling the requirements. In the next section we will add a few more tools and make the execution of all the commands we need a bit more comfortable.
Extending the Toolbox
To finish our project setup we also add a bunch of tools for automatic style checking, code formatting and more. You can find all the config files (mypy.ini, .flake8, .isort.cfg) in the repository we linked in the beginning.
There’s also a pre-commit config to install git hooks for executing all those tools.
For manually executing commands that are needed quite often, we are using make:
# also include the Docker Compose file of the VSCode config to avoid warnings about orphaned services
dc = docker-compose -f docker-compose.yml -f .devcontainer/docker-compose.yml
user_id:=$(shell id -u)
group_id:=$(shell id -g)

build:
    docker build . -t orders_api --build-arg USER_ID=$(user_id) --build-arg GROUP_ID=$(group_id)

run:
    $(dc) up -d api

compile-requirements:
    $(dc) run --rm api bash -c "\
        python -m pip install pip-tools && \
        pip-compile -U -o requirements/requirements.txt && \
        pip-compile -U requirements/test-requirements.in -o requirements/test-requirements.txt"

test:
    $(dc) run --rm api python -m py.test -sv tests

check-black:
    $(dc) run --rm api black --check src tests

flake8:
    $(dc) run --rm api flake8 src tests

# run all checks, formatting, typing and tests
ci: check-black flake8 test
Now we have all the things in place to start the actual development of our service.
In the next post we will add a Postgres service, set up alembic and sqlalchemy and develop our first real API endpoints.